Step by step guide
8 point throwing plan
Step by step guide to home throwing
Prepare the clay first.
Weigh out and wedge 1½ lb of clay. form into a ball about the size of an orange.
Attach the clay to the wheel.
Dry the wheel head and place ball in centre.
Slap the clay down and round to attach it to wheel. You’re aiming for a solid cone shape.
Run finger around base to seal the edge.
Cone up and down.
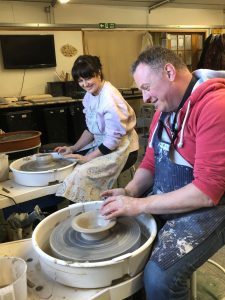
Wet hands and spin the wheel to max. Get comfy with arms braced on the pan, left arm is your anchor and needs to be solid with elbow on your hip.
Cone up by pushing in with both hands. Cone down by pushing down with palm of right hand, keeping left hand on the wheel head and cupping the clay.
Centre. Push forward with left hand from 6 o’clock position at the same time as pushing down hard with right hand like a karate chop. Keep hands wet with slip. You’re aiming for a point of balance and smooth spinning hockey puck with no wobbles. Always relax hands before lifting off the clay or you will knock it off centre.
Relax. Let go.
Open the clay. Reduce speed, find centre with right index finger and push down at a diagonal to open a hole. With left hand supporting the clay, open up the hole by drawing right index finger towards you. You should now have a dog bowl! Compress the base by drawing fingers of left hand lightly across the base from centre to top right and back again a few times.
First lift. Now do your first by making a claw shape with your left hand. Thumb outside and first finger inside. Draw the clay up and in with left hand claw keeping right hand supporting the clay. You should now have a walnut whip sort of cylinder. Neaten up the rim with fingers pressing very gently or a sponge.
Knuckle up. Get into the knuckling up position; knuckle of right index finger outside and fingers of left hand inside, thumb of left hand on top of right hand to brace. Raise hands slowly and steadily with hands moving together as one unit; left fingers on inside slightly higher that knuckle outside, thumb connecting the hands. Allow fingers to rise out of the pot gently without any flourishes. Knuckle up once or twice more. Neaten up the rim each time.
Finish Off. Mop out the inside with sponge.
Tidy up base outside with wooden rib.
Neaten up the rim.
Wire off bottom.
Dry with hairdryer until its firm enough to lift without distorting.
Wire off again if it’s still stuck. Lift onto piece of newspaper on wooden board.
Voila. Well done. You now have a cylinder and can go on to make anything 😊

Wheel Throwing Courses
Aimed at both beginners and those who wish to improve their throwing skills.

Clay Classes
We offer small classes of 8 people. The classes are suitable for beginners and more experienced alike.

Open Studio
Cheshire Clay Studio are proud to be able to display our class members and class leaders work through Open Studio weekends.
Address
Cheshire Clay Studio,
Lowes Farm
Moss Lane
Middlewich
Cheshire – CW10 9NG
Contact Us
07931 351183
